
The Detail That Separates a Good Renovation from a Great One
You can install beautiful cabinetry, choose the perfect countertop, and lay flawless flooring — and the renovation can still feel flat. Walk into that same kitchen at night with a single overhead light casting harsh shadows, and all that craftsmanship disappears.
Now picture the same kitchen with warm under-cabinet lighting washing across a textured stone backsplash, a pair of pendants casting focused pools of light over the island, and recessed fixtures dimmed low to outline the room’s perimeter. Same cabinets. Same countertop. Same flooring. Completely different experience.
Lighting and texture are the two elements that most homeowners underplan and that most contractors under-discuss. They’re not line items that show up prominently in a quote. But they’re what you live with every day, and they’re what buyers notice — consciously or not — when they walk through a home.
This guide covers how to think about both during a renovation: what layered lighting actually means in practice, how texture amplifies the effect of light, what it costs, and — critically — when in the renovation process these decisions need to happen.
Why Lighting Needs to Be Planned Before Walls Close
This is the single most important takeaway in this post: lighting is an electrical decision that must be made during the rough-in phase of your renovation — before drywall goes up. Once the walls and ceiling are sealed, adding or moving lights means cutting, patching, and repainting. It’s expensive, disruptive, and avoidable.
In practice, this means your lighting plan should be finalized at the same time as your kitchen layout, your bathroom tile selection, and your flooring choice. Not after.
What to Decide Before Rough-In
Fixture locations: Every pot light, pendant, sconce, and under-cabinet strip needs a junction box in the ceiling or wall. The electrician needs to know where these go before the drywall crew arrives.
Switch locations and groupings: Which lights will be on the same switch? Which need independent switches? Where will the switches be located? This determines how the wiring is run.
Dimmer circuits: Any light you want on a dimmer needs to be on a dimmer-compatible circuit. This is a wiring decision, not a fixture decision. Decide now, not later.
Voltage for LED strips: Under-cabinet and cove lighting typically runs on low-voltage drivers. The driver location and power supply need to be planned during rough-in.
A good contractor will walk you through this. If your contractor doesn’t raise the lighting plan before rough-in, raise it yourself.
The Three Layers of Light (And What They Actually Do in a Room)
Interior designers and lighting professionals talk about three layers of light. This framework sounds theoretical, but it’s genuinely useful when planning a renovation. Every room in your home should have at least two of these layers, and the most important rooms — kitchens, living rooms, primary bathrooms — should have all three.
Layer 1: Ambient Light
Ambient light is the general illumination that lets you see and move through a space comfortably. It’s the baseline. In most homes, this comes from recessed pot lights, flush-mount ceiling fixtures, or natural light from windows.
The mistake most homeowners make is relying entirely on ambient light. A room lit only by pot lights feels flat, institutional, and unflattering — like an office or a doctor’s waiting room. Ambient light is necessary, but it’s not sufficient.
Best used: Hallways, closets, laundry rooms — any space where function matters more than atmosphere. In kitchens and living rooms, ambient light should be on dimmers so it can be dialed back when other layers take over.
Layer 2: Task Light
Task light is directed, focused light that illuminates a specific area where you’re doing something: cooking, reading, applying makeup, working. It’s brighter than ambient light and positioned close to the activity.
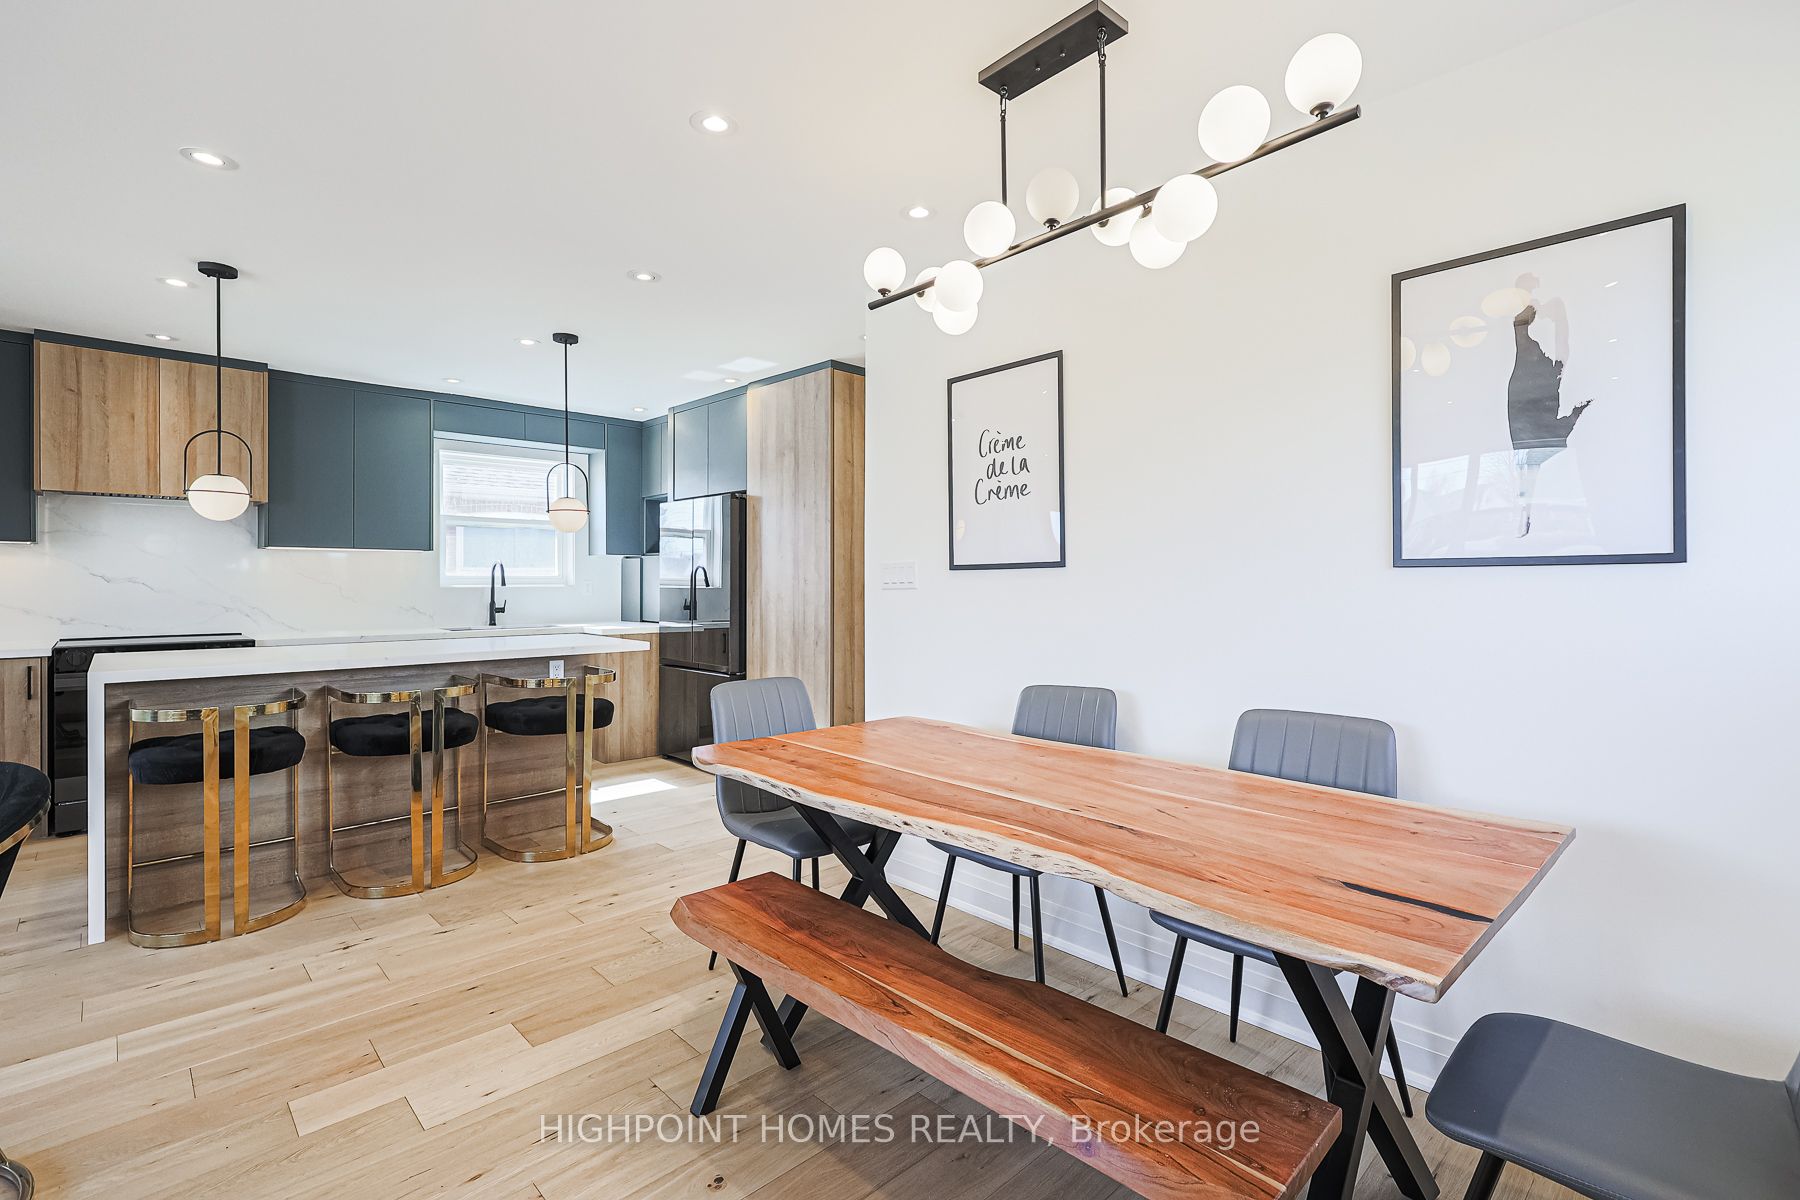
Kitchen: Under-cabinet LED strips illuminating the countertop. Pendant lights over the island. These eliminate shadows cast by overhead lights and make food prep easier and safer.
Bathroom: Sconces flanking the mirror (not a light bar above it — that creates harsh shadows under your eyes). A backlit LED mirror is a modern alternative that provides even, flattering illumination.
Home office: A desk lamp or directed wall-mounted light. Overhead lighting alone creates glare on screens.
Layer 3: Accent Light
Accent light is what creates mood, depth, and visual interest. It highlights architectural features, textured surfaces, artwork, or design elements. It draws the eye and creates contrast between light and shadow, which is what gives a room dimensionality.
Examples: LED strip lighting inside glass-front cabinets, cove lighting along a tray ceiling, a picture light above artwork, toe-kick lighting under a floating vanity, or uplighting behind a console table.
Accent light is the layer most often missing from renovations because it feels optional. It’s not structural. It doesn’t help you chop vegetables. But it’s the difference between a room that looks renovated and a room that looks designed. And it’s the layer that interacts most powerfully with texture.
How Texture and Light Work Together
Here’s where lighting and texture become inseparable: light reveals texture. A flat, smooth surface looks the same under any light. But a textured surface — stone, wood grain, fluted tile, ribbed glass, brushed metal — changes character depending on the direction, intensity, and warmth of the light hitting it.
This is why 2026 renovation design is moving away from perfectly smooth, uniform surfaces and toward materials with physical depth: hand-laid stone mosaics, fluted or reeded cabinetry panels, textured porcelain tile, wire-brushed wood, and natural stone with visible veining.
These materials look good in daylight. Under thoughtful lighting, they look exceptional.
How Different Light Directions Interact with Texture
Side-lighting (grazing light): Light positioned to skim across a surface at a low angle dramatically emphasizes texture. Under-cabinet LEDs grazing a textured backsplash, or cove lighting washing across a stone feature wall, make every ridge and variation visible. This is the most powerful technique for showcasing natural materials.
Top-down lighting: Light from directly overhead flattens texture because it eliminates shadows. This is why a pot-light-only room makes even beautiful surfaces look generic. Overhead lighting is functional, but it’s the enemy of texture.
Back-lighting: Light positioned behind a translucent or semi-translucent material — onyx, frosted glass, thin-cut stone panels — creates a glow effect. This is a premium design technique used in feature walls, bar areas, and vanity mirrors.
Texture and Light Pairings That Work
Stacked stone backsplash + LED strip below upper cabinets: The side-light catches every ridge and shadow in the stone, creating a dramatic focal point. Without the LED strip, the same stone looks flat and dark.
Fluted or reeded cabinet panels + warm recessed light: The vertical grooves create a pattern of light and shadow that adds visual richness to cabinetry. This is a subtle detail that makes kitchen and bathroom cabinets look custom and high-end.
Wire-brushed oak flooring + low-angle natural light: Toronto’s morning and late-afternoon sun enters windows at a low angle, which naturally highlights the grain of wire-brushed or hand-scraped hardwood and LVP. If your main living space faces east or west, this pairing works beautifully without any additional fixtures.
Veined quartz or marble countertop + pendant lighting: Pendants positioned over an island cast focused light that brings out the veining in the stone. Flat overhead pot lights wash the veining out.
Matte tile + backlit mirror in a bathroom: Matte-finish porcelain tile absorbs light softly, creating a calm, spa-like atmosphere. A backlit mirror provides even task light without the harshness of a traditional vanity strip.
Room-by-Room Lighting Guide for a Toronto Renovation
Kitchen
The kitchen is the room where layered lighting matters most because it serves the widest range of functions: cooking (task), eating (ambient), entertaining (accent/mood).
Must-have: Under-cabinet LED strips (task light for countertops), pendant lights over the island (task + design statement), recessed pot lights on a dimmer (ambient).
Worth adding: In-cabinet lighting for glass-front uppers, toe-kick lighting under the island or base cabinets, a dedicated accent light for a textured backsplash.
Skip: Fluorescent tubes under cabinets (harsh, dated colour temperature), oversized chandeliers that block sightlines in an open-concept layout, and recirculating pot lights without dimmers.
Budget: $1,500–$4,000 for a comprehensive kitchen lighting package including fixtures, dimmers, and installation. This does not include the electrical rough-in, which is typically part of the broader renovation electrical scope.
[Informed estimate: fixture + installation costs for GTA kitchen lighting. Does not include electrical rough-in or permit fees.]
Bathroom
Bathrooms are small, and the wrong lighting makes them feel harsh and clinical. The right lighting makes them feel like a retreat.
Must-have: Sconces or a backlit mirror at vanity height (not an overhead bar light), a recessed pot light on a dimmer for general illumination, and a dedicated shower light (waterproof rated).
Worth adding: Toe-kick lighting under a floating vanity (creates a spa-like floating effect and doubles as a night light), a dimmer for the main fixture, and a heated mirror with integrated LED.
Skip: Hollywood-style vanity strip lights (dated and unflattering), cool-white LEDs (anything above 3000K reads as clinical in a bathroom), and overly bright recessed fixtures directly above the mirror (creates shadows under the eyes).
Budget: $800–$2,500 for a full bathroom lighting package.
Living Room
The living room is where accent lighting and texture have the biggest impact, because it’s the room you spend the most time in and the room buyers evaluate most carefully.
Must-have: At least two sources of light at different heights — a ceiling fixture or recessed lights plus table or floor lamps. All on dimmers.
Worth adding: Wall sconces flanking a fireplace or feature wall, picture lights above artwork, cove lighting in a tray ceiling or along a media wall, and LED strip lighting behind floating shelves.
Skip: A single centre-ceiling fixture as the only light source (the “big light” problem), which creates flat, unflattering illumination with no dimension.
Budget: $1,000–$3,000 depending on fixture selection and accent lighting scope.
Basement
Basements present the biggest lighting challenge in Toronto homes because there’s no natural light. The lighting plan carries the entire atmosphere of the space.
Must-have: Layered pot lights on multiple circuits and dimmers (so you can control zones independently), wall sconces or floor lamps to create warmth at eye level, and task lighting in any work areas.
Worth adding: Cove lighting along bulkheads or ceiling drops to soften the edges of low ceilings, backlit shelving or media wall panels, and warm-temperature LED strips along the perimeter.
Key rule: Never rely on pot lights alone in a basement. Overhead-only lighting in a low-ceiling, windowless room is the fastest way to make a space feel like a commercial office. Mix ceiling and wall-level light sources, and keep everything at 2700K–3000K for warmth.
Budget: $2,000–$5,000 for a full basement lighting package in a standard 800–1,000 sq ft space.
Colour Temperature: The Detail That Ruins Good Lighting
Colour temperature, measured in Kelvin (K), controls whether light feels warm (yellowish) or cool (bluish-white). This is arguably the most important technical detail in residential lighting, and it’s the one most often ignored.
2700K: Warm white. This is the standard for living rooms, bedrooms, and dining areas. It creates a cozy, inviting atmosphere similar to traditional incandescent bulbs.
3000K: Soft white. A slight step cooler, popular for kitchens and bathrooms. It’s bright enough for task work without feeling cold.
3500K–4000K: Neutral to cool white. Appropriate for garages, utility spaces, and commercial settings. In a home, this range feels clinical and sterile.
5000K+: Daylight. Harsh and blue-toned. Never use this in residential living spaces.
The Critical Rule
Every light source in a single room should be the same colour temperature. Mixing 2700K table lamps with 4000K pot lights creates a visually jarring mismatch that makes the space feel disjointed. Pick one temperature per room (2700K or 3000K for most Toronto homes) and specify it for every fixture, bulb, and LED strip.
This is especially important in open-concept spaces where the kitchen flows into the living room. If the kitchen is 3000K and the living room is 2700K, the transition will be visible and awkward. Decide on one temperature for the entire connected space.
Textured Materials Worth Considering for Your Renovation
If you’re already planning a kitchen, bathroom, or living space renovation, here are textured materials that interact well with light and are trending in 2026:
Fluted or reeded panels: Vertical grooves in wood, MDF, or plaster applied to cabinet faces, feature walls, or island fronts. These catch side-light beautifully and add visual rhythm.
Natural stone with pronounced veining: Calacatta marble, quartzite, and book-matched porcelain slabs. The veining creates natural texture that lighting can amplify.
Wire-brushed or hand-scraped wood: Whether in hardwood flooring or LVP, a physically textured surface reflects light differently than a smooth finish, adding warmth and character.
Zellige or handmade tile: Slightly irregular, handmade tiles with natural colour variation. Under side-lighting, each tile catches light differently, creating a shimmering, artisanal effect that machine-made tile can’t replicate.
Matte and brushed metal hardware: Matte black, brushed brass, or brushed nickel finishes absorb and reflect light softly, unlike polished chrome which creates harsh reflections. This is why matte finishes dominate 2026 hardware trends.
Ribbed or fluted glass: Used in cabinet doors, pendant fixtures, and partition panels. Ribbed glass diffuses light while adding texture, creating a softer glow than clear glass.
What This Costs and Where to Prioritize
A comprehensive lighting plan across a full main-floor renovation (kitchen, living room, dining area) typically adds $4,000–$10,000 to the project, including fixtures, dimmers, LED strips, and installation. For most renovations, this represents 5–10% of the total budget — a modest allocation for the element that has the single biggest impact on how the finished space feels.
[Informed estimate: based on GTA fixture and installation pricing for residential renovations. High-end designer fixtures can push costs significantly higher.]
If budget is tight, prioritize in this order:
- Dimmers everywhere. This is the single cheapest, highest-impact lighting upgrade. A dimmer switch costs $30–50 and transforms any fixture from harsh to atmospheric. Install dimmers on every circuit in kitchens, living rooms, bedrooms, and bathrooms.
- Under-cabinet kitchen LEDs. The best cost-to-impact ratio in kitchen lighting. $200–$500 for LED strips and a driver, and they transform your countertop workspace.
- Vanity-height bathroom lighting. Replace the overhead bar light with flanking sconces or a backlit mirror. $300–$800 and immediately elevates the bathroom.
- A statement pendant or pair of pendants. One well-chosen fixture over a kitchen island or dining table creates a design anchor for the room. $200–$1,500 depending on the fixture.
- Accent lighting. Add toe-kick lights, in-cabinet lighting, or cove lighting last, once the core layers are in place.
Bottom Line
Lighting and texture are the elements that elevate a renovation from competent to compelling. They’re also the elements most often treated as afterthoughts — chosen after the drywall is up, after the budget is nearly spent, and after the window for proper electrical rough-in has closed.
Plan your lighting at the same time you plan your layout. Choose materials with physical depth and texture that light can reveal. Insist on dimmers. Match your colour temperature. And remember that the goal isn’t brightness — it’s atmosphere.
A well-lit, textured room doesn’t just look renovated. It feels considered, intentional, and expensive — even when the materials and fixtures were budget-friendly.
Planning a renovation in Toronto? Ask Carlton Renovations about our lighting design process — it’s built into every project. Contact us for a free consultation →Contact Us
Modern Kitchen Trends: Beyond the White Cabinet
3 Bathroom Upgrades That Actually Increase Your Home Value
Open-Concept Renovation: What It Actually Takes to Remove a Wall
How Much Does a Basement Renovation Cost in Toronto?
How to Choose a Renovation Contractor in Toronto
Luxury Vinyl Plank Flooring in Toronto – Is it Worth it for Your Home?